HA
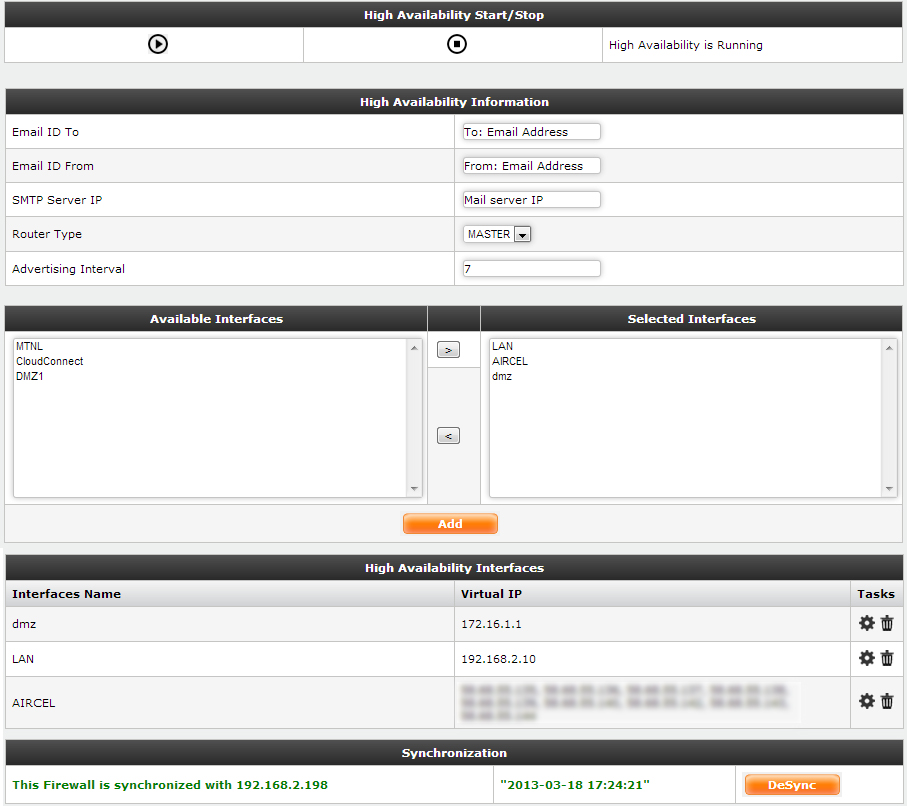
This is the High Availability configuration page. Here you can configure two firewalls in High Availability. One will be the MASTER firewall. And the other will be the BACKUP firewall.
Whenever MASTER firewall goes down (due to any reason), The BACKUP firewall will take over.

HA
Here ,you will find various sections to configure High Availability. Here are the details of information required for configuration :-
Section 1 :- High Availability Start/Stop
There are two buttons available in this section.
● Click  button to start the High Availability service.
● Click  button to stop the High Availability service.
Before starting the HA service, you will have to configure all the information in the HA.
Section 2 :- High Availability Information
Here you can configure various High Availability configuration information. The information are :-
● Email ID To :- Enter the Email ID to which Alerts will be forwarded in case of any High Availability Events (Like whenever BACKUP firewall becomes MASTER.
● Email ID From :- Enter the Email ID from which Alerts will be forwarded in case of any High Availability Events.
● SMTP Server IP :- Enter the SMTP Server IP which will be used for sending mails.
● Router Type :- Router Type indicates the mode in which the Firewall will work. You can select the Firewall to either run as MASTER or BACKUP.
● Advertising Interval :- The Advertising Interval specifies the time in seconds after which the Firewall is being checked for availability.
Section 3 :- Available Interfaces
There are two lists available in this Section.
● Available Interfaces :- This list display all the Interfaces which are configured in the Network --> Basic --> Interface .
● Selected Interfaces :- This list displays the interfaces which have been selected for the High Availability.
Select the interface from the Available Interfaces list and click on the > button. The selected interface will be removed from the Available Interfaces list, and will appear in Selected Interfaces list. Hold the ctrl key to select multiple Interfaces at once.
Section 4 :- High Availability Interfaces
Enter the Virtual IPs in test fields for each interface which are selected for High Availability in Section 3.You can enter multiple virtual IP for single interface. These IPs should be separated by comma.
Section 5 :- Synchronization
This section will be different for the different router type.
● For MASTER, it will have Synchronization Interface, Backup Host and Backup Password field.
⇒ Synchronization Interface :- Select the interface through which the information will be sent to BACKUP.
⇒ Backup Host :- Select the BACKUP firewall host with which the MASTER firewall will be synchronized.
⇒ Backup Password :- Enter the root user password of the Backup Host selected.
● For BACKUP, it will have only Synchronization Interface and Master Host fields.
⇒ Synchronization Interface :- Select the interface through which the information will be sent to MASTER.
⇒ Master Host :- Select the MASTER firewall host with which the MASTER firewall will be synchronized.
Steps to configure High Availability
● Enter the required Information in the Section 1. And select the Interfaces for High Availability from the Section 2 .
● Click on the Add button. After you click on the Add button, you will be asked to enter the Virtual IPs for the Interfaces you have selected. And Section 5 will be available for configuration.
● Enter the Virtual IPs for all the Interfaces in the Section 4 and click on the add button.
● Now enter the information in the Section 5. Now, Click on the Sync button. After you click on the Sync button, it will take a few minute for MASTER to get Synchronized the BACKUP.
● Now, Click on the Start button of the Section 1, to start the High Availability Service.
Now, The Firewalls are configured in the High Availability mode.